Sunday, May 31, 2009

Cricut Video on using End Cap Feature, Fit to Length Button & Centerpoint on the Cricut


I wanted to do a video on explaining how to use the end cap feature on the Plantin' Schoolbook cartridge. End caps are the hearts on either end in the photo above. However, I wanted to use a more girly font, like Storybook, so I set out to figure out how to do that. I found out how, through some trial and error and this video will show you how to do this also!

Confused?

Watch the video!

Also, you can download my directions by clicking on the picture of them below:


Tuesday, May 26, 2009

12 Quick Cards Using the Cricut


I am so thrilled with all the sweet comments I have received about my first video! Thank you! I really appreciate it! And of course, it also charged me up to make another one! So, here's episode 2 - 12 Quick Cards Using the Cricut!

A couple of things first before you view the video....I created two .pdf files to help you make your 12 cards quickly and painlessly! One file is a set of instructions and the other is a file of the "thanks" sentiment that fits precisely in the scrolly frame above. I made these so you could quickly print out the sentiments, cut them using the AutoFill feature on the Cricut Expression and be on your way making your 12 cards super quick! Click below to download the instructions and the "thanks" sentiment .pdf.


Secondly, the example on the video does not use the same paper as on the instruction sheet. I had already cut the paper before I took photos explaining the process so I had to substitute papers. Same concept, though, and the paper is also from the Die Cuts With A View Spring Glitter Stack.

Finally, something happens funny at the end that I decided to keep in - mainly because I had already taped it many times and kept getting interrupted, losing things, etc. Hopefully, you will find it funny also. I was certainly surprised!

If you have any ideas for other videos you would like to see, let me know! Thanks!

Sunday, May 24, 2009

My First Video - Layering Vinyl with the Cricut!

A reader, Kelly, asked me a lot of questions about creating and layering vinyl with the Cricut and so I decided to make a video showing how to do this. Of course, it took a lot longer to make the video and edit it than I thought it would, like most things in life...ha ha! Let me know what you think of it and also if there are other things you would like to see on video! I would love to work on my video skills. I'm praying I am not too dull...

Thursday, May 21, 2009

Card Making Ideas


I'm trying to make more cards these days! For one thing, it's fast and fun! Another is that it uses up the many scraps I have laying around. And finally, it's so nice to receive a hand made card, isn't it? And with those embossing folders that Provocraft makes or the Sizzix texturz plates, the papers and backgrounds are GORGEOUS!

So, next problem is CARD design!

Here are some great resources on the Internet that can ease your card design woes:

1) Sheetload of Cards - This site has a monthly FREE e-zine featuring a card design. The great thing about this e-zine is that they give you cutting instructions to make multiple cards of the same design. So, basically, they show the card design with each component labelled and then they have corresponding cutting directions. Click HERE to see their latest e-zine that contains directions and samples! Click on the picture of the e-zine to download. LOVE THESE GUYS!

2) The magazine Scrapbooks, Etc. has a fabulous website that has all kinds of free downloads and interactive slide shows with samples on it. I received in my email inbox today a little gem of card making ideas that you have to check out! Click HERE to go see all their great card making ideas!

3) This list would not be complete without mentioning the most fabulous MelStampz! Frankly, she deserves her own post because her blog is CHOCK FULL of great information. I have spent hours pouring through her ideas - so many great ideas for making cards, stamping and my ulitimate favorite, 173 ways to use the Cuttlebug and the Big Shot! Click HERE for the Cuttlebug ideas and prepare to while away many hours on her site! IT ROCKS!

4) How about checking out Becky Fleck's site called Page Maps? You may not know this but she also has card sketches! Click HERE to see the March Card Maps. Also, combing through the archives is wonderful - tons of goodies in there! Click HERE and scroll a bit to find the Card Map archives. Or get lost in all the different Page Maps!

5) By now, you all know I love Dawn's Stamping Thoughts! She is a Stampin Up! rep who has produced an astonishing number of card related videos. She gives paper sizing, shows you how to create them and often they are interactive! LOVE DAWN and her very professional, clear, well made videos. Click HERE to head out to her website and see her videos or you can find her on youtube if you do a search for "stampin dawn" - she has over 200 videos so it will come up right away.

6) Have you been over to SplitCoast Stampers yet? That site is addictive! I could pour through the gallery or tutorial sections for HOURS and HOURS! The creations are amazing! They have project tutorials, found HERE, as well as techniques, found HERE. The gallery has loads of examples and inspiration! Really great stuff that you have to see!

Monday, May 18, 2009

Images from the new Cricut cartridges Simply Sweet and Stand & Salute

Linda, who hosts the very, very helpful cricut cheat sheet group on yahoo and also the fabulous blog, Just a Scrappin', posted the latest images of the two newest cartridges as a sneak peek. Linda is always on top of all things Cricut - she's fantastic! I highly recommend you subscribe to her blog!

Simply Sweet looks like the Doodlebug letter stickers of the same name and is shown here:


Stand & Salute, a full cartridge, has all kinds of Americana and military images:


Pre-orders should start showing up on all your favorite Cricut cartridge buying sites. I am hearing a release in mid-late June.July 1 is expected for these.

Friday, May 15, 2009

Programs, Centerpieces, and Purses, oh my!


I belong to a wonderful women's social organization and every year, we have a spectacular Spring Luncheon. This year, I headed up the committee that made our programs, place cards, nametags, little paper purses, as well as paper flowers for the centerpieces. I was so fortunate in the fact that so many wonderful, creative women wanted to help make these purses, programs, etc. and when you are talking 160 of each, it's quite an undertaking.

I was lucky to have discovered that Tuesday Morning had American Crafts cardstock paper on clearance - 25 of the same sheets for $2! When the paper is normally $1 a SHEET, this was an amazing price. I went to four Tuesday Mornings to find as much coordinating paper as I could since each purse took one sheet (160 sheets right there) and then the programs, flowers, centerpiece flowers, etc. took many, many more sheets. I must have cut out over 1000 flowers on the Cricut using Storybook and Accent Essentials cartridges, and the purses were made from the box font (see THIS POST for details) so all of those had to be cut out. There were days when I ran the Cricut for 3-4 hours continuously and it held up like a champ. I went through 4 mats and one blade.

Wednesday, May 13, 2009

Promo photo of Simply Sweet, Stand & Salute, Jubilee & Home Decor Cricut Cartridges

Thanks to Cricut Dan, we have this small photo showing the new cartridges, Simply Sweet, Stand and Salute and the previous releases of Jubilee and Home Decor. Check it out below!


PER CRICUT DAN!

News Update!
A general release of Home Decor and Jubilee will be release July 1st with two new additional carts titled Simply Sweet and Stand And Salute for those patriotic scrapping projects.

LOOK AT THIS BELOW:

Then there will be a Caribbean Cruise Contest with 20 winners beginning July 1st. more details on contest from Cricut.com will be coming soon. I have seen the details and 20 lucky Cricuteer’s will be enjoying a 7 day Eastern Caribbean Cruise between Jan to Feb 2010.


prices shown in pics are full retail: Discounted prices can be found at www.scrapbookcorner.com

Hot off the Cricut rumor mill...more cartridge news...

A retailer on the Cricut board has said she has been notified that ProvoCraft will be offering up the Home Decor solutions cart and the Jubilee cart separately, beginning July 1. These were the cartridges offered in the recent promo (see THIS POST for details of that promo). In addition, two other cartridges were mentioned: one being Stand and Salute (a military themed cartridge) and Simply Sweet (a font cartridge). The dates are not consistent for these releases - one source says June 7 and the other July 1.

Interestingly enough, the promo deal was supposed to be exclusive but now appears that these items will be for sale separately. For once (and I mean, ONCE) I did not get the promo, so at least I still have a chance to get the Home Decor cartridge later.

No sneak peek photos yet and after the whole controversy surrounding the missing word art on Life's A Beach, we may not see any at all before the release. Odd, though, since at most the release is 6 weeks away, and you'd figure the artwork was nailed down by now.

Exciting things happening....

New Michael's Finds (and some new pricing)

Here are some photos of Michael's latest goodies! Lots from Anna Griffin, K& Company, Prima, Making Memories, and Me and My Big Ideas. But, wow! Talk about sticker shock on some of these- $24.99 for 180 sheets of regular (thin) patterned paper or for less than 50 sheets in some cases of glittered/flocked papers. That $5 increase is a surprise! So, even with the 40% coupon, it's going to cost $15! Yikes!

Anna Griffin:


Prima Rocks It Out:


Me & My Big Ideas (MAMBI):


K & Co.:


Making Memories Black Tie Line or should I say, Grey Line:


I loved these K & Co. big box of papers (3 styles) and 150 sheets for $19.99, so $12 with the 40% off coupon - just like the old days of last month! They decided hiding these on the bottom shelf was a good plan, but I found them!

More K & Co:

Front:

Back:

Front:

Back:

Front:

Back:


I got a 50% off coupon for next week at the register so at least one of these goodies may come home with me on Sunday.

Tuesday, May 12, 2009

Flower Pot Card


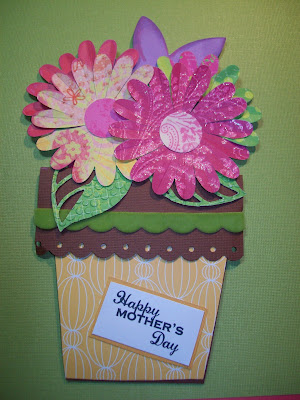
I saw these flower pot cards a week ago and decided to make one for my mom for mother's day. I LOVE how it turned out and it was really, really easy! The flowers were made with a Quickutz 4x4 die, leaves from Accent Essentials Cricut cartridge, sentiment made by me (ha, ha) and envelope made from American Crafts paper with letters and scalloped oval cut from the Storybook cartridge. I made my card with such big flowers that I had to make my own envelope.

See below for directions from the fabulous Dawn, who makes the best videos about card making. Head over to her blog, Dawn's Stamping Thoughts, and subscribe for some inspiration!

Saturday, May 9, 2009

Cricut Settings Table


One thing that is absolutely critical to making the Cricut cut properly is to have the pressure, speed and depth of blade correct for the type of paper you are using. This, by far, is what makes or breaks your Cricut experience. No one wants to ruin expensive paper by accidently having the wrong settings in place and then shredding their paper! It's certainly happened to me enough times, especially when switching amongst different types of paper like going from heavy cardstock to thin patterned paper.

So as not to forget to check the settings each time before I cut, I created the table shown above, which visually reminds me to check the settings and also tells me what settings are appropriate. These are some good guidelines to follow, but may need some tweaking as the machines can be a little different from one another.

Another important tip to remember is to make sure the blade housing number is SQUARE ON facing you. I had mine slightly off center and none of my cuts looked good! I was ready to throw the Cricut out the window until a friend looked at it and immediately diagnosed that as the problem. Thank goodness for Tammy!

A good guideline to follow also has to do with how intricate the cut is that you are trying to make. The more detailed the cut, the SLOWER the speed. And vice versa. Keep that in mind when setting your machine.

Finally, I love to test my cuts on cardstock from Walmart. You can get a pack of 150 sheets of white cardstock (8.5 x 11) at Walmart for less than $6 and it has saved me from numerous mistakes. Look in the office suppy area for this. Another idea is to set your blade and pressure at 1 and watch how the cut moves across the page. It won't cut the page but will give you an idea of the size of the cut.

To snag a copy of my Cricut settings table, click HERE! I hope it helps you in your Cricutting adventures!

Friday, May 8, 2009

Can there really be MORE Cricut Expression Bag Choices?


I got a tip about the above ROLLING bag which is sized to fit the Expression and can be ordered from Target.com; retails for $32.99. It comes in other combinations such as black with white dots, multi-colored pink dots, solid pink and camouflage. Click HERE to see the detail page and to order.


Jaylene sent me a link she used to purchase the above Cricut bag featured earlier! The best thing about her source is that you can get the bag in practically any color!

Here are the color choices:
Hot Pink
Black
Forest Green
Kelly Green
Khaki
Lavender
Maroon
Navy
Orange
Purple
Red
Royal Blue
Turquoise
White
Yellow

WOW! Click HERE to order one of these for $22.95!

Thursday, May 7, 2009

Have you ever wanted to get all the Stampin Up Markers and Ink Spots?

My friend and Stampin Up! rep Barb is running a super, great deal over on her blog, SnowManLover, that is a four month marker/ink spot buy in club. In just four months, you could own the ENTIRE set of markers with case, as well as ALL of the ink spots! Check it out by going HERE! She is super quick to reply to all questions and is just fabulous!

Tuesday, May 5, 2009

Gift Card Holders


Look, a post with nothing to do with the Cricut!! ;-)

I saw the cutest little folders over on Split Coast Stampers and decided to make one to put a gift card in for Teacher's Appreciation Week. Our school is asking parents to donate $10 gift cards and the teachers will select one randomly at a teacher's luncheon later this week. I decided to use the Sping Glitter Stack paper as a base since it is two-sided and well, gorgeous! Then, for the inside sentiment, I printed it out on the computer and then mounted it on white paper that had been embossed by the Cuddlebug. I finished the outside off with a coordinating band and stamped "thank you" (stamp from Joann's) and flowers cut from a Quickutz die. The card goes into the bottom pocket, which could be adjusted to be larger or smaller and hold a gift card, a tag, an RSVP, etc. Also, that pocket could be decorated by using one of those border punches. Lots of possibilities with this!

Click HERE to find the directions on Split Coast Stampers.

Monday, May 4, 2009

Hello Kitty Cupcake Card

Being an original fan of Hello Kitty, back in the day where you had to go the department store (Burdines, anyone?) to find HK, I had to get the Hello Kitty greetings cartridge! It is just too darn cute! There is a card feature for each icon in the book and there are many that don't even feature HK, if that's not your thing.

Recently, I had to make a birthday card for a child and so I chose the cupcake card to make. Oh, boy. That took some trial and error, let me tell you!

Here's what I finally ended up doing:

1) Cut the card itself in white cardstock at 5 3/4". This card size just fits into an A2 envelope.
2) Cut a blackout of the cupcake in black cardstock at 5 3/4" using the blackout layer key.

All good, so far, right? Then came the different layers.

3) Cut the white frosting layer at 6 1/4". WHAT? Why did I change the setting? Because the setting (5 3/4") that goes with the card left WAY too much black space showing and I wanted lots of frosty goodness showing!
4) Cut the bottom cupcake liner out at 6 1/4".
5) Cut the chocolate frosting layer at 6 1/2" HUH? Another different sizing?? Well, I thought this looked better - even more frosting.
6) Cut the cherry at (WAIT FOR IT...........................) 6 3/4" - yes, that's right, a FULL INCH larger than the original setting.

As you can see below, those layers worked out pretty well. OK, the chocolate layer is a little bit too big but hey, it's chocolate! The more the better, right??

7) Run frosting layers through the Cuddlebug or Big Shot with the Cuddlebug Swirl embossing folder. A quick word about that swirl embossing folder...it's amazing. If you are going to get any embossing folders, I highly recommend this one. Although, they are all fantastic and fairly cheap ($2-$5 depending on the sale price).

Here is the card below without any stickles BUT with red glitter paper used for the cherry.


Here is the card below with white cheapo, fake Stickles I picked up at Walmart. Uh, oh! Who knew there were such vibrant green flakes in it? I didn't realize I couldn't use that on the brown without it looking BAD. I had to do it over so I pried up the brown layer and cut and embossed it again.


Here is the final card....used Cinammon Stickles on the brown...MUCH BETTER!

Saturday, May 2, 2009

Costco has the Cricut Expression for $279.99...

Costco has a great deal on the Cricut Expression machine!!!

Hree are the particulars:


Shipping and handling is included in the price!
Cricut Expression machine Comes with THREE cartridges, including Plantin Schoolbook, Accent Essentials and STORYBOOK! (Have I mentioned that Storybook is my favorite, most used cartridge??)
ONLINE ONLY

All for $279.99!

Offer available through May 3!!

Click HERE to order!

Also, if you know anything about Costco, they are amazing about returns so should anything EVER happen with the machine, they will stand behind it.

Copyright

Unless otherwise stated within the post, this is my original work. Please feel free to use as inspiration for your own personal use, but do not use for publication, contest/message board entries, or to sell. If my work inspires a work of your own, please give credit by posting a link to my blog. Thank you! MyFreeCopyright.com Registered & Protected