Monday, August 29, 2011

Subway Art Christmas Pillow with Cricut Word Collage Cartridge

It's been over 100 degrees practically everyday this summer and frankly, I can't wait until Christmas!  So, to get in the mood, I thought I'd do a Christmas project.

Ever since I got the Cricut Word Collage cartridge, I have been dying to make something with the Christmas subway art on it.  Since I love pillows, I thought decorating a pillow case would be fun. I got the idea to use iron-on vinyl and iron-on flocked vinyl all in different colors to make it more interesting.  My iron-on vinyl is from Expressions Vinyl and worked like a dream.

Here's a quick tutorial on how I did this:

First, using my Gypsy and the Word Collage Cricut cartridge and the Christmas word art image as shown, I made a file with different pages for each color. I made sure to "flip" all my images so it would cut out correctly.  I used the "hide select contour" button to hide the words I wanted.  To see a video on how to "hide contour" on your Gypsy, check out this video by Provocraft HERE.  The Gypsy file will be available for download at the bottom of the post.

Next, I cut out my various colors of iron-on vinyl, making sure the heavy plastic side was face down on the mat.  I used a brayer and sometimes painters tape to make sure there was no shifting (see photos below):

 Take note that I had to figure out exactly where each word art section went based on its color.  I did that by zooming in to those sections on my Gypsy and then carefully laying out my trimmed down pieces.
I cut the word art out using a blade depth of 4, pressure and speed at 3, according to the Expressions Vinyl website.

Next, I did some weeding.  That means I removed the vinyl areas that I didn't want to iron on.  I made sure to get the spaces inside the letters (like the "O", for example).

I used the Cricut tool below to help do the weeding.  It is fantastic!
Then, I carefully trimmed down the sections and laid them on my pillowcase.  I used a quilting ruler to make sure my lettering went on straight.
 I ironed on my pieces from there.  The recommended time was 10-15 seconds, using hard pressure.  I did it for longer since I couldn't press down too hard, as I have an over the door ironing board.  The regular vinyl plastic can be removed while it is either hot or cold and the flocking vinyl (white and black) plastic needed to cool first.
So, the great news is that everything is on straight and it all ironed on nicely.  The bad news was that I left too much room at the top and had to fill in with something else.  The Storybook Cricut cartridge had a nice flourish so I cut that at 2" using the white flocked vinyl.

 More ironing and I made sure to cover the "Feliz Navidad" section with some of its plastic backing, just to be safe.
To finish things off, I added a red button that I threaded with red and white twine in between the leaves above the "Santa Claus".
Pillowcase is from Ikea and the pillow size is 20" x 20".

To download the Gypsy file, click HERE.

Let me know what you think!  Are you a fan of subway art?

Want to see more of my projects? Click HERE to see my gallery!

Subscribe to Obsessed with Scrapbooking to learn more about ways to use the Cricut in your scrapbooking! Share/Save/BookmarkAdd to Technorati Favorites

Saturday, August 20, 2011

Cricut Teresa Collins Chic n Scary Layout

I did a fun layout with the new Cricut Seasonal Cartridge Chic & Scary seasonal cartridge using DCWV Halloween paper.

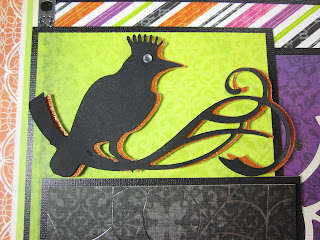
 There are six cuts on the layout above: 2 spiderwebs (6" and 2"), one spider(1-1/2"), Scary(2-1/4"), bat and bird (both 2").
 I double layered the bird above, shadowing it with orange glitter paper.
 I did the same with the bat.  Rhinestones looked much better in person.  Journaling tag was made using Stampin Up! punches.
"Scary" is actually tripled layered; black on the bottom, then orange, then green.  With these one layer cartridges, it helps to "double layer" them and offset the second layer to create a faux shadow.

Sorry for the wonky photos....my regular camera broke (darn it!) and iPhone didn't take the best photos...

Don't forget I have TWO giveaways going on!  Drawing is on Sunday!

To enter the Gypsy machine giveaway, click HERE!
To enter to win the Best of 2008 Cricut cartridge, click HERE!

Want to see more of my projects? Click HERE to see my gallery!

Subscribe to Obsessed with Scrapbooking to learn more about ways to use the Cricut in your scrapbooking! Share/Save/BookmarkAdd to Technorati Favorites

Thursday, August 11, 2011

 Today's bouquet of flowers was made using the new Cricut Sophie cartridge (a Cricut Circle exclusive cartridge). This idea could also be done using many other Cricut cartridges such as Accent Essentials, Flower Shoppe, Paisley, Hello Kitty Greetings, Life's A Beach, Pack Your Bags, Picturesque, Sweet Treats and many others.
What made this project easy was that these are actually flower cards so I was able to glue the stems right in between the sides of the cards.  Stems were just from the flower arranging department in Hobby Lobby and they came in this green color. I cut the flower cards at 5".  I intended originally to make this into a card set but then decided a bouquet would be more fun.  Projects sometimes change scope as I work on them - how about for you?
 Paper was by Stampin Up! and through a magical twist of fate and good fortune, I had buttons that matched exactly.  These were hot glue gunned into place (is that even a word?...LOL!).  Leaves were cut at 2" and I used glue dots to hold them in place.  Those glue dots are remarkably strong!
Thanks for looking!

My blog redesign is coming along and I'm really looking forward to showing it to you guys.  I hope you like it!  I'm going for a fun, but more streamlined look.

Have a great day!

Want to see more of my projects? Click HERE to see my gallery!

Subscribe to Obsessed with Scrapbooking to learn more about ways to use the Cricut in your scrapbooking! Share/Save/BookmarkAdd to Technorati Favorites

Tuesday, August 9, 2011

Make Your Own Dishwasher Detergent Vinyl Project

Photobucket


Ok, typically, I am not the "make it yourself" kinda gal at all.  But, I had been fond of using these little Cascade pillow-type dishwasher detergent tablets and frankly, they can get pricey quick (23 loads for $6).  So, when I saw this vinyl project on Being Creative (to keep my sanity)  that combined crafting with making dishwasher detergent, I wanted to give it a try.

Photobucket


I followed the recipe on Being Creative (to keep my sanity) but used just a third of the recipe since it makes so much and can harden over time if not air-tight.  I bought the same kind of container she did at Walmart but I think mine is smaller.

I couldn't wait to try it out and was so pleased with my results!  Just as good as the pillow-tablets I had been using and at a fraction of the cost.

A word on the text - I used the Cricut Don Juan cartridge and cut the base letters at 1-1/4" using blue Cricut vinyl.  It was a teeny bit too big (eyeballed the length - whoops!) but I thought it was close enough.  Now, there's no excuse that my kids can't tell how to use this - LOL!

This is a scrap-lifted project I just had to pass along - send her some comments if you give this a try!

Want to see more of my projects? Click HERE to see my gallery!

Subscribe to Obsessed with Scrapbooking to learn more about ways to use the Cricut in your scrapbooking! Share/Save/BookmarkAdd to Technorati Favorites

Friday, August 5, 2011

"4 You" Close to My Heart Card

 Can you believe there are SIX different Cricut cuts on this card? I used the new Close to My Heart Art Philosophy Cricut cartridge that's been my feature here and on Everyday Cricut this week.

So, what are the six cuts?
1) the card base and background - isn't this a cute shape?
2) the swirls
3) the shape the "4" is on
4) the "4" shows both fonts layered on one another
5) the flower (three mounted on one another)
6) the "you" - lower case solid font

The paper used on this card is also from Close to My Heart and is called Sophie.

Here is another close up of the Art Philosophy Cricut Cartridge bundle:


If you are still on the fence because you need more information, let me help you out with that. The cartridge is only sold as a bundle at this time which includes 3 full-size stamp sets and three sheets of dimentional chipboard for $99. Not a bad price considering the stamp sets are typically more than $17 each and the chip board is about $5 each. (click image below to see larger)


The cartridge is a full size, includes two fonts, as well as many tags and layered images.  Not only that, there are other stamp sets in the Close to My Heart catalog that coordinate with this cartridge, redefining the idea of stamping and then cutting out your image.

The bundle sells for $99 (item # Z1686) and considering the stamp sets alone would retail for over $17 each, this is a great deal.

Not a stamper but still would like the cartridge?  Don't forget that the stamp sets included in the bundle are exclusive and there may be others who would like to just own those...

You can only get the Art Philosophy cartridge in this bundle and through a Close to My Heart consultant.  If you do not have a consultant and would like to purchase this cartridge bundle, head over to my Close to My Heart site by clicking HERE.

Want to see more of my projects? Click HERE to see my gallery!

Subscribe to Obsessed with Scrapbooking to learn more about ways to use the Cricut in your scrapbooking! Share/Save/BookmarkAdd to Technorati Favorites

Wednesday, August 3, 2011

Close to My Heart Art Philosophy Plaque


I love to make wall art and I thought it would be fun to use the new Cricut Close to My Heart Art Philosophy cartridge and assorted Close to My Heart papers and embellishments (including the "Express Yourself" stamp).  I picked up this 8" x 8" plaque at Hobby Lobby during a recent clearance sale and got to work.


The "Express Yourself" stamp is framed by a Close to My Heart metal frame and then mounted on two layers on chipboard shapes.  The beige and blue shape was cut with the Cricut and then mounted on the matching chipboard.

 The flower above was made using the cartridge also.  I inked the edges and mounted it on a tag and then various swirls I had cut - I love the swirls on this cartridge.  I inked the edges of those swirls also.

I used a monster sized glue dot to attach the flower to the front of the plaque - it's not going anywhere!  I can't wait to put a photo of my daughter on this plaque!


Here is another close up of the Art Philosophy Cricut Cartridge bundle:


If you are still on the fence because you need more information, let me help you out with that. The cartridge is only sold as a bundle at this time which includes 3 full-size stamp sets and three sheets of dimentional chipboard for $99. Not a bad price considering the stamp sets are typically more than $17 each and the chip board is about $5 each. (click image below to see larger)


The cartridge is a full size, includes two fonts, as well as many tags and layered images.  Not only that, there are other stamp sets in the Close to My Heart catalog that coordinate with this cartridge, redefining the idea of stamping and then cutting out your image.

The bundle sells for $99 (item # Z1686) and considering the stamp sets alone would retail for over $17 each, this is a great deal.

Not a stamper but still would like the cartridge?  Don't forget that the stamp sets included in the bundle are exclusive and there may be others who would like to just own those...

You can only get the Art Philosophy cartridge in this bundle and through a Close to My Heart consultant.  If you do not have a consultant and would like to purchase this cartridge bundle, head over to my Close to My Heart site by clicking HERE.


Want to see more of my projects? Click HERE to see my gallery!

Subscribe to Obsessed with Scrapbooking to learn more about ways to use the Cricut in your scrapbooking! Share/Save/BookmarkAdd to Technorati Favorites

Copyright

Unless otherwise stated within the post, this is my original work. Please feel free to use as inspiration for your own personal use, but do not use for publication, contest/message board entries, or to sell. If my work inspires a work of your own, please give credit by posting a link to my blog. Thank you! MyFreeCopyright.com Registered & Protected