Monday, February 28, 2011

Five Must-Make Mini-Albums Series- How We Met

First up on the Five Must-Make Mini-Album series is the "How We Met" mini-album.

I decided to record the story of how my husband and I met and the journey we've been on together since in an 8"x 8" album that I presented to him one Valentine's Day.

I got the idea because I always wondered about how my grandparents had met, what they were doing in their lives when they met, what things happened along the way, etc.  I love romantic things like that and wanted to record my own romance (G rated, of course, for those worried...).

To get started, I chose a red 8" x 8" album from Colorbok and gathered up various related papers in cream, red, pink, black and patterned.  I had various "love" type embellishments that I used along the way.  I had collected these in a 12"x12" Iris case just to prepare for this album.

Tip #1:  Collect all your papers and embellishments together in a 12"x12" Iris case...that way you have all your materials together.

Tip #2: Consider making a timeline by year, showing where you lived, or other significant events as they occurred.

Here are my pages:


Do you have an album like this?  Are you thinking about making one?

Check back tomorrow for another Must-Make Mini-Album; it's stellar!

Subscribe to Obsessed with Scrapbooking to learn more about ways to use the Cricut in your scrapbooking! Share/Save/BookmarkAdd to Technorati Favorites

Sunday, February 27, 2011

Five Must-Make Mini-Albums!

Join me this week for my series on Five Must-Make Mini-Albums!

All this week, I will be showcasing different must-make, must-have mini-albums with tips, tricks and techniques for getting those memories and photos scrapped!

I love mini-albums because there is typically a defined start and finish to the project.  I like the smaller size of them and the versatility they offer.  And, I hope, by the time I'm done showing you these mini-albums, you will be inspired to try some yourself, if you've never gone down that road.  To me, this is the most satisfying scrapbooking because you can finish!  It's not on-going.

These are some of my favorite albums of all time - the ones my kids and family look over the most!

Included this week is an album that was my best received, most cherished creation that I made for someone very special.  And, I had a blast doing it!   Wait until you see how easy it was to make, especially by getting others to help.

Check back in the morning for the first album...don't miss out!

Subscribe to Obsessed with Scrapbooking to learn more about ways to use the Cricut in your scrapbooking! Share/Save/BookmarkAdd to Technorati Favorites

Saturday, February 26, 2011

Miami Madness

A few shots around Miami..where I grew up. We took a ride down there today to see how things had changed and as usual, everything looked quite different. Some parts of it are even more lush and beautiful than ever before, especially around the University of Miami. I miss the large banyan trees that were destroyed in Hurricane Andrew. But overall, things look better than ever! They finally finished widening an expressway (Palmetto) that I had worked on as an intern in college - it's a big improvement!

Driving was the usual roller coaster ride of constant unexpected terrifying moments and there were only two times I thought might turn into fatalities for us, but our guardian angels were working overtime and all was well!


My favorite Cuban restaurant EVER - La Carreta, at Bird and 87th Avenue in Miami - has the most delicious Cuban food I have ever eaten! Upon landing in Ft. Lauderdale, we immediately zoomed to Miami to have some Cuban food!  Brian had chicken and yellow rice while I had piccadillo (a ground beef dish). We shared some fried yuca (like a potato) and also some plantains (cooked bananas).


Brian wanted a cafe con leche afterwards. Infinitely better, stronger and cheaper than Starbucks! I love this window they have for walk-ups!


Some boats and a view of the bay...


The entrance quad at my high school. WOW - has it changed! I love the sailboat from 1926 they now have in the quad.

Subscribe to Obsessed with Scrapbooking to learn more about ways to use the Cricut in your scrapbooking! Share/Save/BookmarkAdd to Technorati Favorites

Friday, February 25, 2011

Going on Cruise but have a surprise for you...


I'm heading out to be a guest instructor on the Cricut Cruise in just 6 hours BUT I have a fun series of posts coming up that I hope you will just LOVE.  So, keep checking back, you won't want to miss it...

Subscribe to Obsessed with Scrapbooking to learn more about ways to use the Cricut in your scrapbooking! Share/Save/BookmarkAdd to Technorati Favorites

Sunday, February 20, 2011

Sweet Baby Giraffe Card


Internet woes today!  I had this 4-1/4" x 5-1/2" card ready earlier but Photobucket did not want to let these photos upload!  So, onto plan b...

This super cute giraffe and the shape he is sitting on is from the new Creative Memories Stork's Delivery cartridge.  I love some of the layered background shapes on this cartridge!


First off, I cut the giraffe's shadow layer three times at 3-1/2" (key 32).  I then cut the rest of the giraffe's layers.  Everything layers from the bottom up.  Cut your shadow first and then cut the base and corresponding layers (layer 1, layer 2).


Then, using the thinner pop dots from Stampin Up! I created a multi-layered giraffe.

Here's the background image (key 42), which I cut at 2-1/4" and used the Sugar and Spice font feature key.  All I had to do was turn it 90 degrees and it was perfect! See handbook page below:


The giraffe's eyes cut out small at this size so I thought some wiggle eyes would be fun; he kind of reminded me of that giraffe from that movie Madagascar...


OK, maybe not....ha ha!


Finally, a strip of coordinating paper inside finishes the card off.  Paper was by October Afternoon and Stampin Up!, ribbon by Michaels, sentiment ("baby") by Papertrey Ink.  Fiskars scalloped border punch was also used.

Check back for more projects coming soon!

Subscribe to Obsessed with Scrapbooking to learn more about ways to use the Cricut in your scrapbooking! Share/Save/BookmarkAdd to Technorati Favorites

Thursday, February 17, 2011

Hello Thursday - THREE new Cricut Cartridges Released! Stork's Delivery, Vintage Papers and Heirloom

Provocraft has released two new cartridges this month!

Imagine Colors and Patterns Vintage Papers - Some beautiful Tim Holtz-y styled papers for use in your Imagine machine


These printed out a little brighter than they show here.  I was very pleased with how they came out!

Imagine Colors and Patterns Heirloom Papers - More vintage-y papers for use in your Imagine machine. I love the paper with the dress forms and famous old buildings - so funky and pretty!


Now what about the giveaways!??!

Here they are:

1) Cricut Just Because Cards Cartridge:


2) Scotch Pink ATG (adhesive tape gun):

How can you win?

1) Leave a comment letting me know if you like cards or layouts better.
2) Follow or subscribe to the blog.  That's it!

Winners will be drawn next Thursday, February 24.


Tomorrow, I will have Imagine projects posted so check back!  Melanie has got some amazing projects and giveaways posted so head over to Courtney Lane Designs to see!

Have a good day!  I am planning on it as my honey just got home after 9 days away!

Subscribe to Obsessed with Scrapbooking to learn more about ways to use the Cricut in your scrapbooking! Share/Save/BookmarkAdd to Technorati Favorites

Monday, February 14, 2011

Yudu Cardshop Valentine's Card, Review and MORE!


Happy Valentine's Day, everyone!  I hope you have lots of hugs, kisses and chocolate today and celebrate with family, friends, and loved ones!  My honey is out of town (WAH!) and so I'm planning a pity party for myself....not really (ok, maybe I was but I have to quit that foolishness!).  Actually, my parents and I are going to have a nice lunch together and then hopefully, I'll have some fun with my kids, after school.

Today's card was made using the new Yudu Cardshop, on sale at HSN exclusively.  Basically, the Yudu is a large screen printing machine and the Yudu Cardshop is a mini version of the regular sized Yudu.  Screen printing on the Yudu Cardshop can be done on a variety of materials, such as paper, fabric, canvas, etc.  

The first thing I did after opening up the Yudu Cardshop that Provocraft sent was to watch the enclosed DVD.  It was fantastic - clear, concise and that Jinger Adams is such a skilled teacher!  The screen printing was much easier than I thought it would be.  I used the birdcage screen and despite it's detailed image,  the ink went onto the card with no problems.  

Now, the mat you adhere the card to, during printing, is VERY sticky.  Had I realized how sticky it was, I would have pressed the mat up to a t-shirt or towel just to reduce the stickiness.  Why?  Because the card wanted to permanently bend when I removed it.  So, you'll see below that I cut it down and matted it to help with that problem.  One other tip is to wash those screens out PRONTO or the ink can dry and they will be ruined.  They warn of this on the DVD so just be careful.


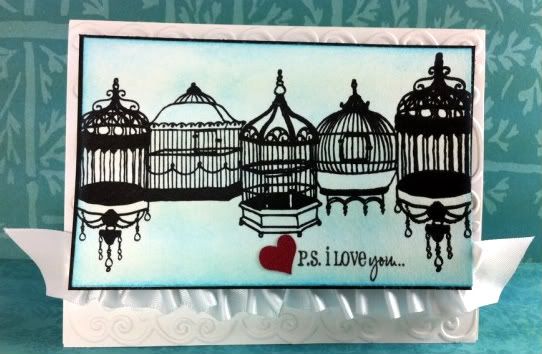
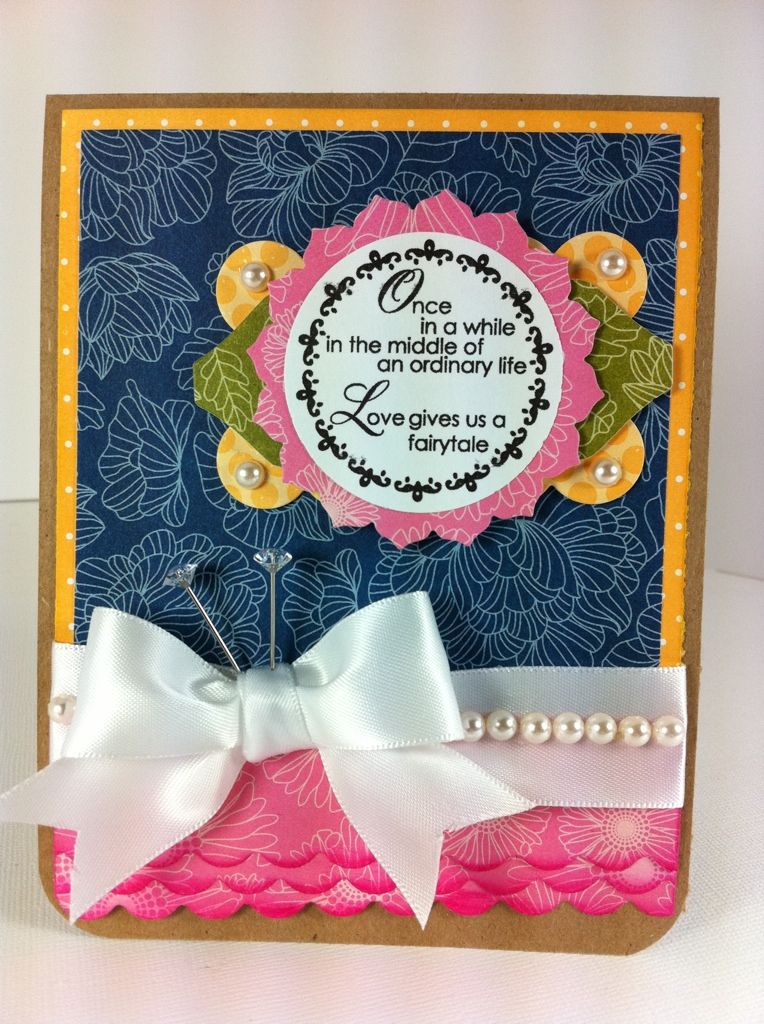
I used some blue chalk ink to give it some depth. I also used My Creative Time's "p.s. I Love you" stamp from her "You had Me at Chocolate" stamp set.  I am in love with these stamps!  So darn cute!  The heart is actually cut from Plantin Schoolbook at 1/2".  I used an embossing folder (Sizzix) and ran it through the Cuttlebug for the card front (card is sized at 4-1/4" x 5-1/2").  Love that Cuttlebug - it's small footprint makes it easy to have right in reach on the desk! Satin ribbon is from Michaels.


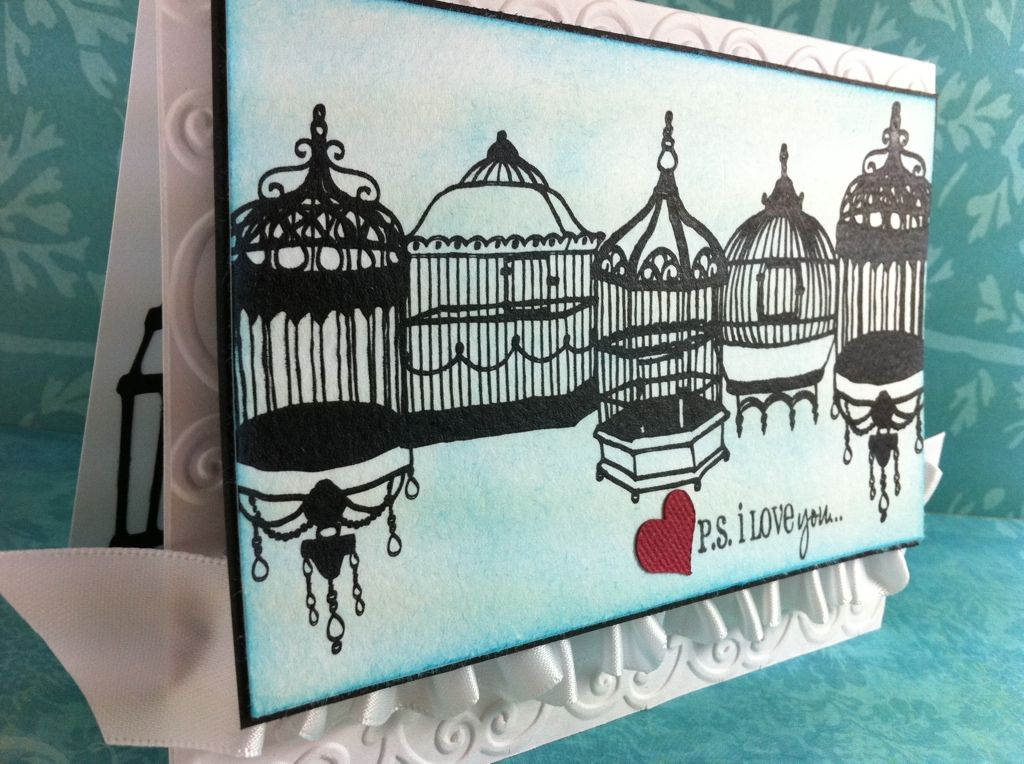
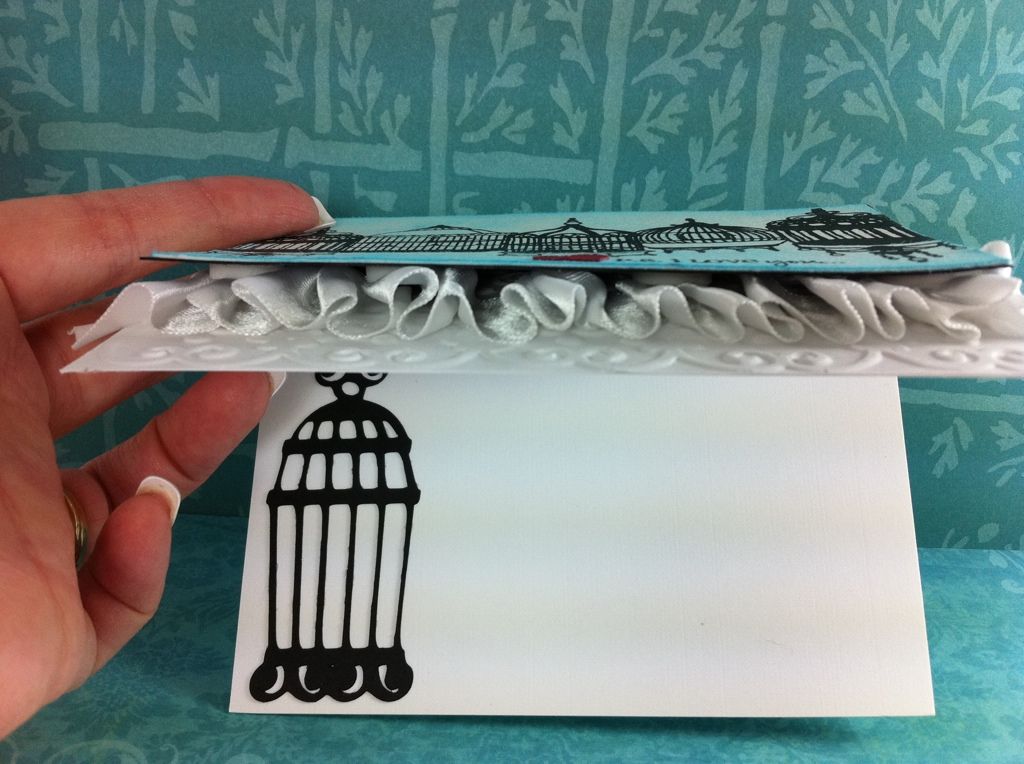
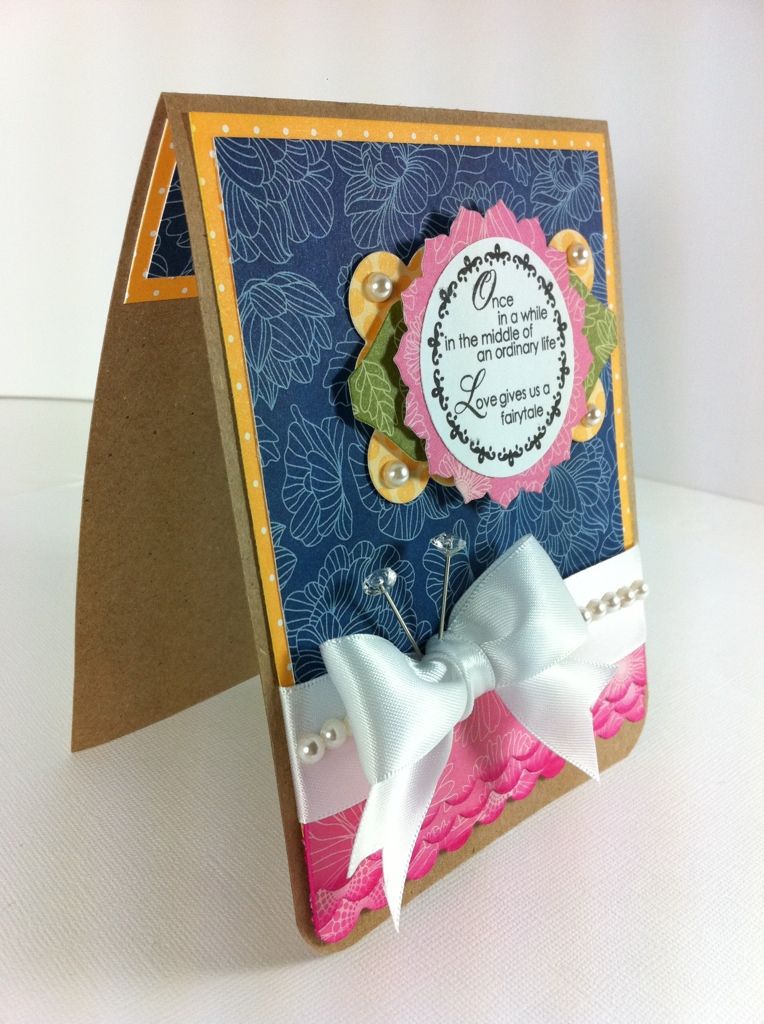
As you can see, the satin ruffle does add some depth to the card so I would use a large envelope for this card.  The ruffle reminds me of a garter and so then I started thinking this could turn into a wedding card, with a different sentiment.  The birdcage inside is just one layer from the Serenade cartridge.  I cut it at 3-1/2".  I kept it unlayered to mirror the front images.

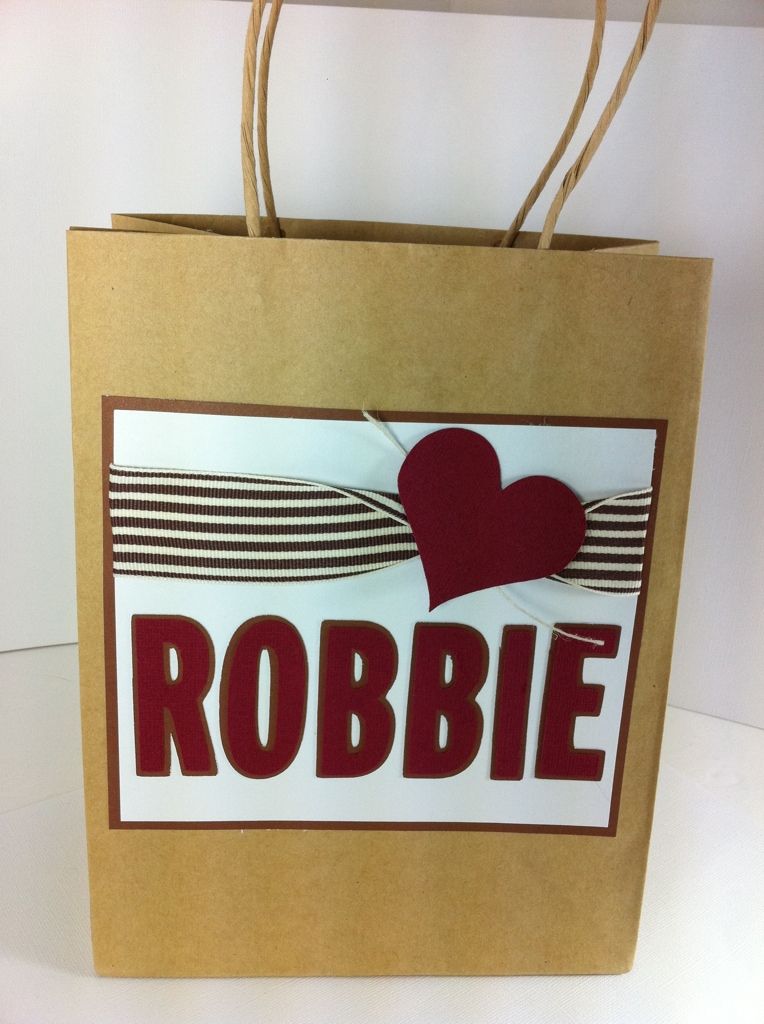
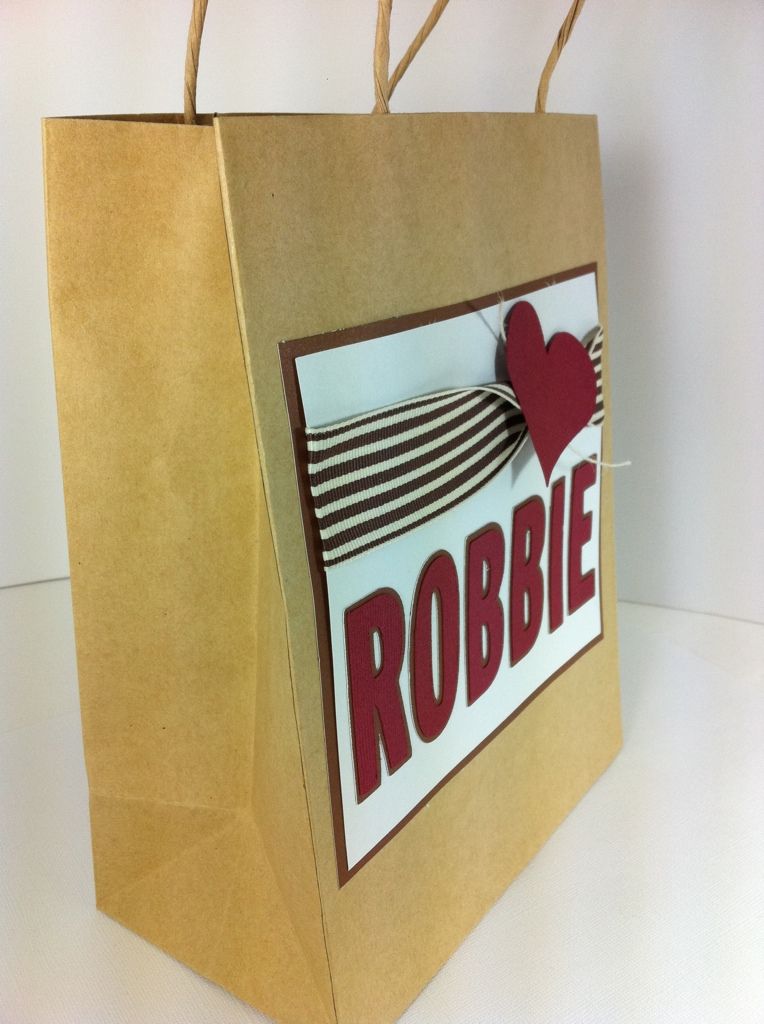
Now, onto a quick project I made tonight for my son's Valentine Party tomorrow.  My son wanted printed Valentines so we went with the Teenage Mutant Ninja Turtles.  I just taped on a lollipop to each one and called it good (hence no photo...).  But, the school also wanted a bag or box.  I didn't want anything too girly and so thought this bag would be perfect (also nice and simple...).

I used the Street Sign cartridge and cut his name at 2-1/2" with regular and shadow feature keys.  The heart is from Plantin Schoolbook again.  A quick strip of ribbon from Stampin Up! and matting the background and I was done.  Zip, zip!  I am hoping he actually will attend the party.  As you may know, he has high functioning autism and sometimes these parties are a bit much for him so we'll see.


Have a great day, my sweet Valentines!  Thank you so much for reading my blogs and being so encouraging and wonderful!  HUGS!

Subscribe to Obsessed with Scrapbooking to learn more about ways to use the Cricut in your scrapbooking! Share/Save/BookmarkAdd to Technorati Favorites

Monday, February 7, 2011

Official Provocraft Video on new Expression 2.

Click below to see the video! Can't see it? Go HERE!


Subscribe to Obsessed with Scrapbooking to learn more about ways to use the Cricut in your scrapbooking! Share/Save/BookmarkAdd to Technorati Favorites

Papertrey Ink Challenge Card

Papertrey Ink is continuing their 4 year birthday celebration with a free download of circular images/sentiments and challenge today.  The big winner of the challenge will get to design a stamp set for them!

Say what?

I know....so cool!

Of course, it took all day to figure out what to do in between family outings, nail appointments, grocery shopping, THE SUPER BOWL, etc.  So, now, at 11:45 p.m., I am finished with my entry.

Here it is:


Paper, sentiment, and die shapes all by Papertrey Ink.  Ribbon from Michaels.  Pearls from Hobby Lobby.  Stick Pins by Maya Road.

Thanks for looking!

Later today, I'll be putting up the winners of My Creative Time's Stamps and the Cricut Magazine so check back!

Subscribe to Obsessed with Scrapbooking to learn more about ways to use the Cricut in your scrapbooking! Share/Save/BookmarkAdd to Technorati Favorites

Copyright

Unless otherwise stated within the post, this is my original work. Please feel free to use as inspiration for your own personal use, but do not use for publication, contest/message board entries, or to sell. If my work inspires a work of your own, please give credit by posting a link to my blog. Thank you! MyFreeCopyright.com Registered & Protected